
Building the Round 2 Space: 1999 Eagle Part 1
About | Information | History | Online | Facts | Discovery
This video is part 1 detailing my build of Round2's Space: 1999 22" model of the Eagle. This part focuses on the the cockpit and command module.
Comments
-
Hi, Interstellar Modeler! The build looks great so far. The time watching actually flew by. But I have a question about the kit itself. Do you have any idea why they didn't make the seats for the astronauts to sit in instead of mounting them to the back wall? The astronauts also wore harnesses that they could have just molded into the suits, right? Do you think it was too much detail that no one would notice? Thanks and keep up the great work and videos!
-
Wow. I'm not a big sci-fi fan, or not yet anyway, but I was blown away with your work on the cockpit and command module. Also impressed with the astronaut detailing and the use of translucent paint - very good. When you mask something off, you really mask it off. I wish everyone had your patience. Very good work. And you are right - growing up in the 70s, we all would have thought our space program would have been farther along than it is - should almost be criminal that it isn't. Thank you.
-
where did you get the leds for this model. great job.
-
Have just got this model and viewed part one of your build outstanding work sir 👍
-
Lolz, didn't know this show existed, never heard of it! Odd since I was into all the old Sci-Fi.
-
Hello dear Sir, please can you give le the name of the paint primer grey that you have using for your Eagle ?
In advance a great thanks again, Olivier. -
Hello dear Sir, once again I have a little question but this time it's about the glue.
Before to start my Eagle I would like to know if this glue is good for the Eagle, "Liquid Cement for Plastic
8872C" link: http://www.testors.com/product-catalog/testors-brands/model-master/adhesives/adhesives
In advance a great thanks, Olivier -
Hello dear Sir,
Please can you give me the references and names of the paints that you have used for the rear board and for the pilots ?
At 8:015 for the rear board and 5:13 for the two pilots, please can you give me these references ?
Once again a great thanks for your assistance and for your sharing. Olivier -
Hello dear Sir, Awesome video.
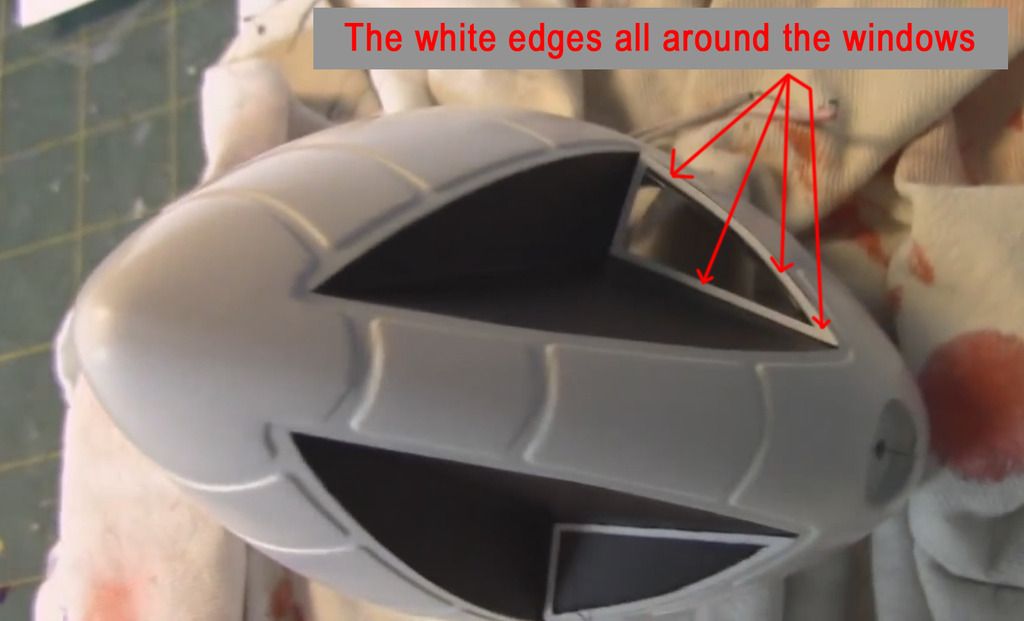
I would like how can create all the white edges all around the windows of the cockpit ?
In fact you paint the narrow edges with a white color or other method ?
Here I join you one photo of these white edges: http://i923.photobucket.com/albums/ad71/Skullr01/Withe%20edge%2001.jpg
Please can you explain to me because it's not easy to do, a great thanks in advance and excuse me for my poor English. Best regards, Olivier. -
nice model, however the cockpit interior is inaccurate, the seats are set way up high, when in the show the pilots actually had to step down into the seats, I'm actually altering mine to adjust the position of the pilots, everything else on the kit looks pretty accurate. yep I'm picky, lol
-
Really outstanding work IM. Came out looking just like a scene off the old tv screen. Gerry and Sylvia Anderson would have hired you in a heartbeat man. Thanks for posting this up.
-
good idea, thanks !
-
hi, i did a mistake, i forgot to mask the 2 window frame in the bottom, they are completely black ! what i can do to paint them white, if it is possible, any idea ?thanks
-
Hi, you d'idnt talk about Windows clear parts, did you install these or stay open.? thanks
-
Thanks, im ready to start my eagle now.
-
what kind of primer you used? thanks for sharing your experience!
-
Good modeler, smart with what to buy and whats just crazy out of the ballpark. Thats one of the things I like about your channel. Good advice. I mean, who is going to know after a metalizer that you didn't buy to overpriced engine bells?
-
Good schtuff! At least you put some forethought into the lighting, unlike somebody we both know who decided to light it at the last minute.
-
Instead of installing the translucent styrene sheet in front of the LED you can alternatively sand the clear "front lens" portion of the LED itself. Gives various amounts of diffusion based on grit of paper used. For even more diffusion (and further light intensity loss, of course. Everything comes at a price, right? :D) you can then paint the sanded LED in a semi-opaque (or do a thin airbrush coat of opaque paint of) colour of your liking.
-
Were did you get the kit from
19m 14sLenght
143Rating